Jekyll Installation Guide
To develop the Progettone® website, we will use a Static Site Generator (SSG), which allows you to create fast-loading websites without the need for complex backend systems or databases. Specifically, we will use one of the most popular SSGs, Jekyll. Jekyll is a free and open-source SSG based on the Ruby programming language. You don’t need to know Ruby to use Jekyll; you just need to have Ruby installed on your computer.
Table of Contents
The Advantages of Jekyll
Ease of use: Jekyll uses plain text files and markdown syntax to create and manage content, so you don’t need to know HTML or CSS to get started.
Speed and security: Jekyll doesn’t interact with databases or server-side scripts, reducing the risk of vulnerabilities and attacks. It generates static HTML files, making the site incredibly fast and secure.
Customizability: Jekyll is highly customizable, allowing the use of layouts and templates or the creation of plugins to extend its functionality.
Easy deployment: Jekyll generates static HTML files that can be deployed on a web server or hosting provider without the need for a dynamic content management system.
In the following guide you will find the prerequisites to get Jekyll working
How to Install Jekyll on Windows
To install Ruby and Jekyll on a Windows computer, you need to use RubyInstaller. This can be done by downloading and installing a Ruby+Devkit version from RubyInstaller Downloads and using the default installation options and taking the latest recommended version (leave everything as it is, especially MSYS2).
This operation will take a few minutes.
In the final step of the installation wizard, run ridk install (as recommended), which is used to install gems. For more information, see the RubyInstaller Documentation.
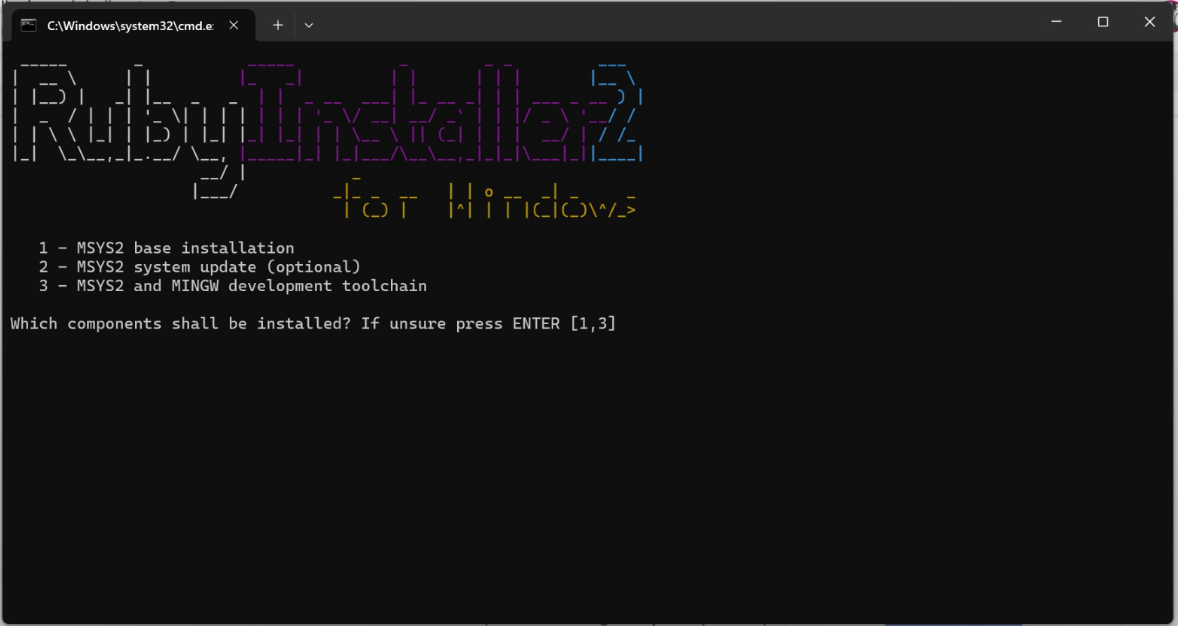
At the end of the installation, you will see this prompt:

Among the options, choose MSYS2 and MINGW development toolchain (3 Enter).
This operation takes a few minutes and it’s normal for some warnings to appear.
Open a new command prompt window and install Jekyll and Bundler with the following command:
gem install jekyll bundler
Verify that Jekyll is installed correctly:
jekyll -v
If you see the version number, it means Jekyll is installed and working correctly on your system. Now everything is ready to start using Jekyll!
How to Install Jekyll on macOS
By default, Ruby is preinstalled on macOS, but you can’t use this version of Ruby to install Jekyll because it’s outdated. For example, on Ventura, the preinstalled Ruby version is 2.6.10, while the latest version is 3.1.3.
To solve this problem, you need to install Ruby properly using a version manager like chruby.
Homebrew
First, you need to install Homebrew (in the unlikely case you haven’t already done so).
To check if Homebrew is installed, run the command
brew -v
If it’s already installed, you’ll see the version number.
To install Homebrew on your Mac, run the following command in your terminal:
/bin/bash -c "$(curl -fsSL https://raw.githubusercontent.com/Homebrew/install/HEAD/install.sh)"
The system may ask you to accept the Homebrew license terms, follow the instructions that appear:
sudo xcodebuild -license
and after scrolling through the license terms, type
agree
to accept.
Once the installation is complete, configure your shell to automatically use brew: to use brew from your terminal you’ll need to add it to PATH, the program will tell you exactly how to do it at the end of the installation, it’s something like:
(echo; echo 'eval "$(/opt/homebrew/bin/brew shellenv)"') >> /Users/username/.zprofile
  eval "$(/opt/homebrew/bin/brew shellenv)"
Once the installation is successfully completed, quit and restart the terminal, then verify if Homebrew is ready to use by running this command:
brew -v
Chruby and Ruby-install
If you saw the Homebrew version, you can proceed with installing chruby and ruby-install with the following command.
Continue with the installation of chruby and ruby-install using the following command:
brew install chruby ruby-install
Now you can install the latest version of ruby, 3.1.3, using the ruby-install package you just installed:
ruby-install 3.1.3
This operation will take several minutes.
Once the installation is complete, configure your shell to automatically use chruby with the following command:
echo "source $(brew --prefix)/opt/chruby/share/chruby/chruby.sh" >> ~/.zshrc
echo "source $(brew --prefix)/opt/chruby/share/chruby/auto.sh" >> ~/.zshrc
echo "chruby ruby-3.1.3" >> ~/.zshrc
~/.bash_profile Note: if you use bash instead of zsh, the command is the same, just point to the different terminal type: ~/.bash_profile Close and reopen your terminal and check that the correct version of ruby is now in use:
ruby -v
Jekyll and Bundler
Now you can install the latest updates of gems and bundle (which may take a few minutes):
gem update --system
gem update
gem cleanup
Finally, install Jekyll:
gem install jekyll
Verify the version to make sure the installation was successful. If it’s installed correctly, you’ll see the version number.
jekyll -v
How to Install Jekyll on Linux
Installation on Linux is very similar to that on macOS. You can install Ruby using your package manager (apt, yum, etc.) and then install Jekyll using gem.
For Ubuntu/Debian:
sudo apt-get install ruby-full build-essential zlib1g-dev
For Fedora:
sudo dnf install ruby ruby-devel @development-tools
Then install Jekyll:
gem install jekyll bundler
Using Jekyll
Once Jekyll is installed, you can create a new site or work with an existing site.
Creating a new site
To create a new Jekyll site:
jekyll new my-site
cd my-site
bundle exec jekyll serve
For more information, see the official Jekyll documentation.
Your site will be available at http://localhost:4000/.
If the new site starts successfully, you can consider Jekyll correctly installed on your system. Good work!